
You cannot use this as a drill guide, only as a layout guide. Attempting to use the guide as a jig will ruin the layout guide and the blanks. If you want a jig for this instead, we offer one on our store.
The Layout Guide is designed to align with the front and top of the blank. This is the reference point for all machining or hole drilling, so alignment is crucial. It is designed to mark the locations of holes to be drilled, slots, or trimming for certain stocks. Drilling is performed on each side, not all the way through the blank.
Before you start:
1. Use a ¼” transfer punch, not a tapered center punch
2. Do not use as a drill jig. The drill bit will wander and ruin the Layout Guide and the blank.
3. Don’t mark the holes with a lot of force while using the Layout Guide. After you have removed the Layout Guide and inspected the markings, use a punch and make them larger / deeper to better center your drill bits.
4. You will need 10mm, 7mm, 5mm, 5.5mm, and 4mm bits. An extra 4mm is recommended for drilling pilot holes for the larger bits.
4mm bits can be substituted with 5/32" bits, and 5.5mm with 7/32".
We sell bits sets with extra 4mm (5/32) on the store.
5. Pre-drill larger holes with a smaller drill bit to ease drilling, bit wear, and prevent wander.
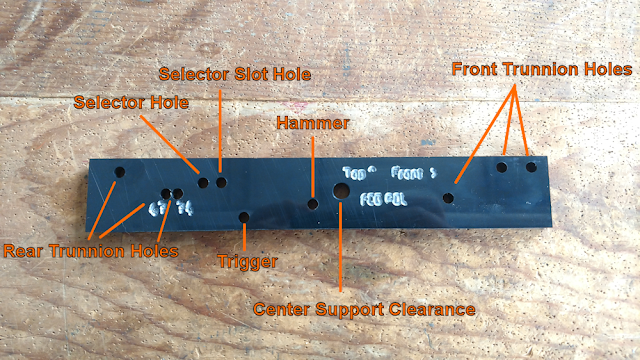 Note the separately marked 47 and 74 rear rear trunnion holes. If drilling trunnion holes, choose accordingly.
FCG Drilling Instructions:

Mark Ejector Side (Left side when looking down blank like you would when shouldering)
Layout Guide alignment:
- The engraving Top ^ indicates the edge to be aligned to the top of the blank.
- The engraving Front > indicates the edge to be aligned with the front of the blank.
This alignment is crucial for accurate marking. To do so:
- Lay the blank upside down on a flat surface with the Ejector side facing you.
- Place the Layout Guide against the blank with the engraved side pressed against the blank. Please note this is opposite for the Operator side.
- The Top edge of the layout guide should be aligned with the top surface of the blank, upside down against the surface it is laying on.
- The Front edge of the layout guide should be aligned even with the front of the blank. Use a good straight edge, square, or similar to ensure this.
- While keeping it aligned, use clamps to secure the Layout Guide to the blank, making sure the guide doesn't shift while doing so. A second person is helpful for this.
After ensuring that the guide is still aligned after clamping you can begin marking your holes.
Use a ¼” transfer punch to mark:
Selector
Trigger
Hammer
DO NOT mark the frontal hole for the selector, this is used to locate the front of the slot on the Operator side only.
Trigger
Hammer
DO NOT mark the frontal hole for the selector, this is used to locate the front of the slot on the Operator side only.

Mark Operator side (Right side when looking as if you were shouldering your complete rifle, Selector markings will appear on this side)
Layout Guide alignment:
- The engraving Top ^ indicates the edge to be aligned to the top of the blank.
- The engraving Front > indicates the edge to be aligned with the front of the blank.
This alignment is crucial for accurate marking. To do so:
- Lay the blank upside down on a flat surface with the Operator side facing you.
- Place the Layout Guide against the blank with the engraved markings facing away from the blank. Please note this is opposite for the Ejector side.
- The Top edge of the layout guide should be aligned with the top surface of the blank, upside down against the surface it is laying on.
- The Front edge of the layout guide should be aligned even with the front of the blank. Use a good straight edge, square, or similar to ensure this.
- While keeping it aligned, use clamps to secure the Layout Guide to the blank, making sure the guide doesn't shift while doing so. A second person is helpful for this.
After ensuring that the guide is still aligned after clamping you can begin marking your holes.
Use a ¼” transfer punch to mark:

Remove the clamps and Layout Guide.
- Selector
- Selector Slot
- Trigger
- Hammer
Our Drill bit sets use 5/32" bits in place of 4mm as they are interchangeable. The bit sizes for each hole are as follows:
Ejector Side Drill Sizes
- Selector - 5mm (Pre-Drill with 4mm)
- Trigger - 7mm (Pre-Drill with 4mm)
- Hammer – 7mm (Pre-Drill with 4mm)
- Center Support – 4mm
Operator Side Drill Sizes
- Selector – 10mm (Pre-Drill with 4mm)
- Selector Slot – 7/32” (Pre-Drill with 4mm)
- Trigger - 5mm (Pre-Drill with 4mm)
- Hammer - 5mm (Pre-Drill with 4mm)
- Center Support – 4mm
- On the Operator side, the selector slot is finished by removing material between the 10mm Selector hole, and the 7/32” selector slot hole for a final "keyhole" shape.


